RSS M-400 Betriebsanweisung
Stöbern Sie online oder laden Sie Betriebsanweisung nach Audiomischer RSS M-400 herunter. RSS M-400 User`s guide Benutzerhandbuch
- Seite / 33
- Inhaltsverzeichnis
- LESEZEICHEN
- M-400 RCS 1
- Contents 3
- Introduction 4
- The two modes of M-400 RCS 5
- Operating requirements 6
- Installing M-400 RCS 6
- Uninstalling M-400 RCS 6
- About the M-400 Driver 6
- Connection to the M-400 7
- Starting the application 9
- Exiting the application 9
- M-400 RCS window 10
- Screen recall buttons 11
- Scene memory buttons 11
- Fader layer buttons 12
- Fader modules 1–24 12
- Main fader module 12
- SENDS ON FADER Panel 13
- About the menus 15
- Using M-400 RCS 16
- Saving a project 17
- Switching between modes 18
- Switching to offline mode 20
- REAC input/output settings 21
- Initializing the settings 23
- Preference settings 24
- System settings 27
- M-48 settings 28
- Offline mode 29
- Online mode 31
- Appendix 33
Inhaltsverzeichnis
User’s GuideM-400 RCSRoland corporation and its affiliates assume no responsibility for any loss or damage (loss of profits, loss of data or other eco
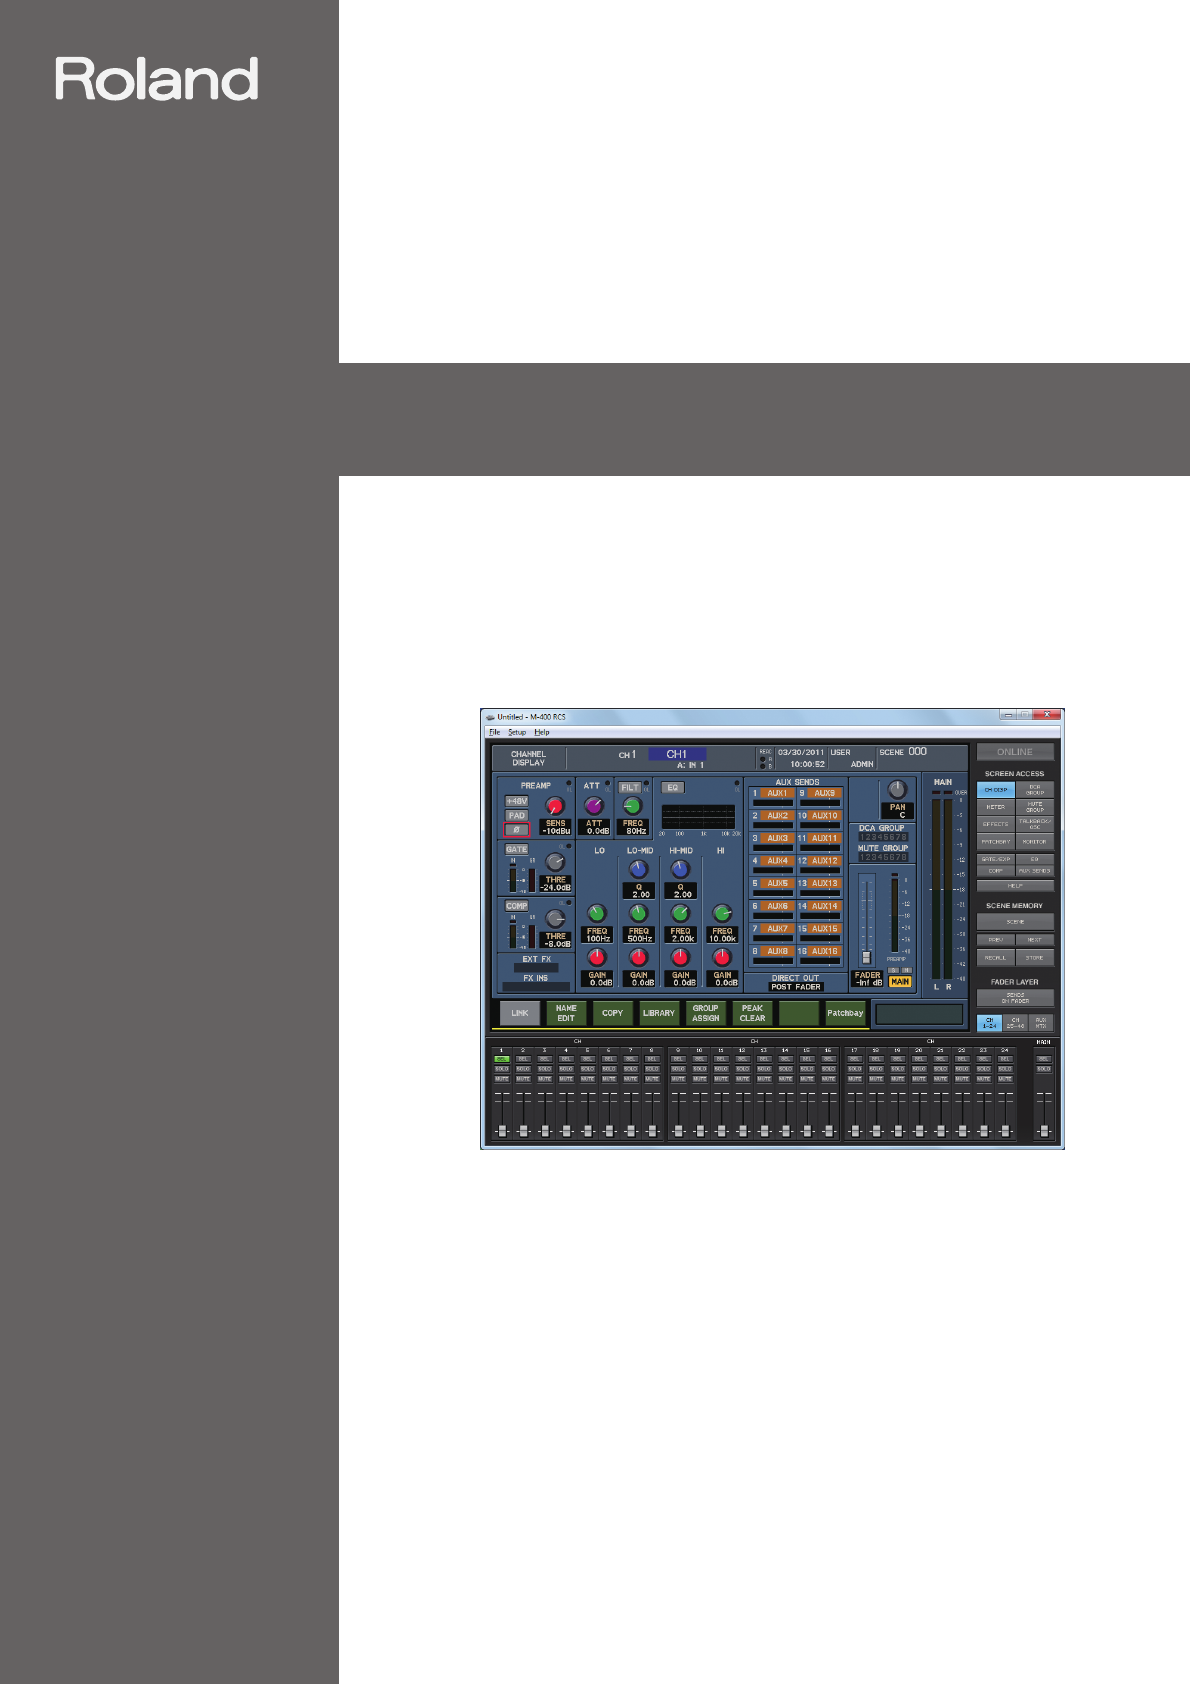
10Names of things and what they dofig.ScrRCSGuide.epsBasic screen areafig.ScrChDisp.epsThis shows a screen of the same design as the screen of the M-4
11Names of things and what they doScreen recall buttonsfig.ScrScreenAccess.epsThese buttons switch the content of the basic screen area. The button co
12Names of things and what they doFader layer buttonsfig.ScrLayer.epsThese buttons switch the layer operated by fader modules 1–24. The currently sele
13Names of things and what they dofig.ScrRCSSOF.epsThis panel is shown when SENDS ON FADER button is on.SENDS ON FADER PanelAUX SELECT 1–16 buttons Se
14Names of things and what they doThe mouse and keyboard are used to perform operations in M-400 RCS’s main screen area.• Up/down/left/right cursor ke
15Names of things and what they doFile menu● New Project Opens a new project.● Open Project... Opens an existing project.● Save Project Saves the curr
16Using M-400 RCSOpening a new project1From the “File” menu, choose “New Project.”A message box will appear, asking you to confirm whether you want to
17Using M-400 RCSSaving a project under its current name (Overwrite)1From the “File” menu, choose “Save Project.”The project will be saved under its c
18Using M-400 RCS1Click the ONLINE button.fig.ScrOffline.epsfig.ScrSync1.epsThe “Synchronize” dialog box will appear.2In the “Project” field, specify
19Using M-400 RCSIf you selected “Send to CONSOLE” in step 2, a message box will ask you to confirm the project synchronization.fig.ScrSyncConfirm2.ep
20Using M-400 RCS1Click the ONLINE button.fig.ScrOnline.eps2M-400 RCS will switch to offline mode.fig.ScrOffline.epsSwitching to offline mode
21Using M-400 RCSIn offline mode, you can make virtual settings for an input/output unit (e.g., S-1608 stage unit, S-0816 FOH unit, S-4000S 40-channel
22Using M-400 RCSIf you choose S-4000S in the REAC Config dialog box, a 32-in/8-out configuration will be applied. To change the S-4000S module config
23Using M-400 RCS1From the “Setup” menu, choose “Initialize.”fig.ScrInit.epsThe “Initialize” dialog box will appear.2Place a check mark in the section
24Using M-400 RCSHere’s how to make preference settings within M-400 RCS. The settings you make here will not be reflected in the M-400 console.1Windo
25Using M-400 RCSscreen.● Fader LayerThis chooses the fader layer buttons (p. 12).● Main FaderIf you select “SENDS ON FADER MASTER”, the MAIN fader mo
26Using M-400 RCS1From the “Setup” menu, choose “LCR Setup...”fig.ScrLCRSetup.epsThe “LCR Setup” dialog box will appear.2Use the LCR SYSTEM check box
27Using M-400 RCS1From the “Setup” menu, choose “System Setup...”fig.ScrLCRSetup.epsThe “System Setup” dialog box will appear.2Select the desired item
28Using M-400 RCSYou can manage and make settings for the M-48 Live Personal Mixer in the same way you do from the M-400 console.M-400 RCS cannot use
29Offline modefig.OfflineEdit.epsOffline mode lets you edit M-400 project files when you don’t have an M-400 console at hand. A project file you’ve ed
3ContentsContents ...3Introduction ...
30Offline mode4Edit the project.If necessary, use the “Reac Config” dialog box to make REAC input/output configuration settings.5Save the project file
31Online modefig.OnlineEdit.epsOnline mode lets you remotely control the M-400 console from M-400 RCS. Level meter data from the M-400 console and ope
32Online mode2Start up M-400 RCS.fig.ScrRCS.epsA new project will open.3If necessary, open an existing project file.4Click the “ONLINE” button to begi
33AppendixWarning/error messages shown in the basic screen area are the same as on the M-400 console. For details on warning/error messages, refer to
4IntroductionM-400 RCS is application software that runs on Windows (XP, Vista or 7) or Mac. It lets you edit M-400 project files, and remotely contro
5IntroductionM-400 RCS has two modes: Offline mode and Online mode.Offline modeIn this mode you can edit an M-400 project file via USB memory. The adv
6Introduction* This software has been found to work on typical computers that meet the above requirements, but we do not guarantee that it will operat
7Introduction.In order to remotely control the M-400 console from M-400 RCS, you’ll need to connect the M-400 to your computer using a USB cable.Use a
8Introduction4Press [F2 (USB MIDI)] to access the USB MIDI tab.fig.ScrM4SysRemUSB.eps5In the RECEIVE section, select the “Sys Ex” button.fig.ScrM4SysR
9Starting and exiting the application1In the “M-400 RCS” folder, double-click “M-400 RCS”.fig.ScrRCS.epsThe application will start up, and the M-400 R
© 2020, manymanuals.de. Alle Rechte vorbehalten. | 0.043 s |
 Manymanuals.com
 Manymanuals.de
 Manymanuals.fr
 Manymanuals.it
 Manymanuals.pl
 Manymanuals.cz
 Manymanuals.es
 Manymanuals-pt.com
Kommentare zu diesen Handbüchern